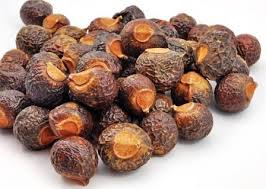
In the quest for natural and chemical-free skincare, Aritha soap (also known as soapnut soap) stands out as an ancient Ayurvedic remedy with proven benefits. Known for its gentle cleansing properties, Aritha soap is made from the fruit of the soapnut tree and is rich in natural saponins that cleanse skin and hair without harsh chemicals.
At dirghaanshi, we believe in harnessing the power of nature for health and wellness. Making Aritha soap at home is a rewarding DIY project that lets you enjoy the purest form of this natural cleanser. This step-by-step guide will walk you through the process of creating your own Aritha soap, ensuring it is safe, effective, and free from harmful additives.
Long Description
Why Make Aritha Soap at Home?
Control over Ingredients: Homemade Aritha soap uses only natural, high-quality ingredients, without preservatives or synthetic chemicals.
Cost-effective: Making soap at home can save money compared to buying commercial or even natural store-bought soaps.
Customizable: You can add other beneficial herbs or essential oils to tailor the soap for your skin type and needs.
Eco-Friendly: By making your own soap, you reduce packaging waste and ensure the soap is biodegradable and gentle on the environment.
What You Need: Ingredients and Tools
Aritha (Soapnut) powder or dried soapnut fruit – the main cleansing agent rich in saponins.
Natural oils (such as coconut oil, olive oil, or castor oil) – to nourish and moisturize the skin.
Distilled water – for dissolving soapnut powder.
Optional additives:
Essential oils (tea tree, lavender, or neem) for fragrance and added skin benefits.
Herbs like turmeric or neem powder for enhanced cleansing and antibacterial effects.
Soap mold or any shallow container
Mixing bowl
Saucepan or double boiler
Sieve or muslin cloth
Stirring spoon
Step-by-Step Guide to Making Aritha Soap
Step 1: Prepare Soapnut Extract
Take 50 grams of dried Aritha (soapnut) powder or break the dried fruits into small pieces.
Boil the soapnut in 500 ml of distilled water for about 15-20 minutes.
Strain the liquid through a muslin cloth or sieve to separate the soapnut pulp.
Allow the liquid soapnut extract to cool. This is your natural cleansing base.
Step 2: Mix Natural Oils
In a mixing bowl, combine 100 grams of your chosen natural oil(s) — coconut oil for moisturizing, olive oil for softness, or castor oil for lather.
Gently warm the oils to a liquid state if they are solid at room temperature.
Step 3: Combine Soapnut Extract and Oils
Slowly mix the cooled soapnut extract with the oils in a large bowl.
Stir continuously until the mixture is uniform.
If desired, add 10-15 drops of essential oils and a teaspoon of powdered herbs for added benefits and fragrance.
Step 4: Heat the Mixture
Pour the combined mixture into a saucepan or double boiler.
Heat on low flame while stirring continuously until the mixture thickens into a soft, gel-like consistency (this may take 20-30 minutes).
Be careful not to overheat or burn the mixture.
Step 5: Pour into Molds
Once thickened, pour the soap mixture into soap molds or a shallow tray lined with parchment paper.
Smooth the surface with a spatula.
Allow the soap to set at room temperature for 24-48 hours until solidified.
Step 6: Cure the Soap
Remove the soap from the molds and place the bars on a drying rack.
Let the soap cure for 1-2 weeks in a cool, dry place to harden and improve shelf life.
Tips for Best Results
Use pure, organic Aritha powder to ensure the soap is free from pesticides and contaminants.
Customize your soap with herbs like turmeric for brightening or neem for antibacterial effects.
Always test a small patch of skin before regular use to check for allergies.
Store soap bars in a dry place to prevent premature melting or bacterial growth.
Benefits of Homemade Aritha Soap
Natural cleansing without harsh chemicals preserves skin’s moisture barrier.
Gentle enough for sensitive skin and babies.
Helps in reducing acne, dandruff, and scalp irritation.
Contains antibacterial and antifungal properties for clearer skin.
Supports an eco-friendly lifestyle by avoiding plastic packaging and toxic ingredients.
Why Choose Homemade Aritha Soap over Commercial Soaps?
Factors Homemade Aritha Soap Commercial Soap
Ingredients Natural, chemical-free Often synthetic with chemicals
Skin Impact Gentle, nourishes, soothes Can irritate or dry skin
Environmental Impact Biodegradable, minimal packaging Chemical residues, plastic waste
Cost Affordable with natural ingredients Varies; sometimes cheap but less natural
Customization Fully customizable with herbs & oils Fixed formula, limited customization
Conclusion
Making your own Aritha soap at home is a fulfilling and healthy way to embrace natural skincare. With simple ingredients and easy steps, you can create a chemical-free, gentle cleansing soap that nourishes your skin and hair. At dirghaanshi, we encourage natural remedies that empower you to take control of your health and beauty routines sustainably.
Try this step-by-step guide to homemade Aritha soap today, and enjoy the pure goodness of Ayurveda in your daily cleansing ritual!