In an age where chemical-laden skincare products are linked to long-term damage and sensitivity, nature-based alternatives are making a powerful comeback. At Dirghaanshi, we’re passionate about reviving traditional remedies, and one such gem is the handmade Aritha soap blended with essential oils.
Aritha, also known as Reetha or Soapnut, is a time-tested Ayurvedic herb used for cleansing and skin therapy. When combined with essential oils like lavender, tea tree, or rosemary, Aritha transforms into a luxurious soap bar that not only cleanses but also heals and rejuvenates the skin—without any toxins or artificial ingredients.
In this blog, we’ll guide you step-by-step on how to make your own Aritha soap at home using essential oils. We’ll also discuss the benefits, usage, and tips for best results, making this a complete natural skincare guide.
🧼 Long Description: Step-by-Step Guide to Making Aritha Soap With Essential Oils
🌿 What is Aritha (Soapnut) and Why Use It in Soap?
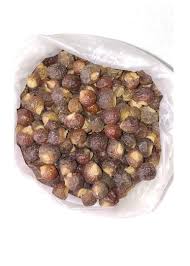
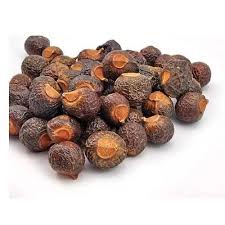
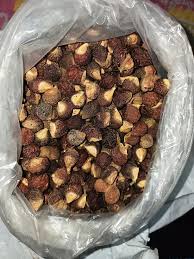
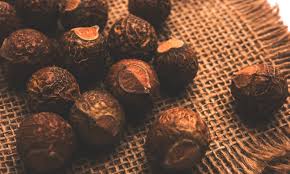
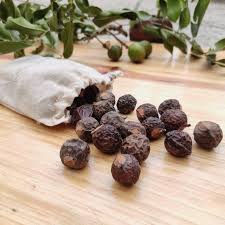
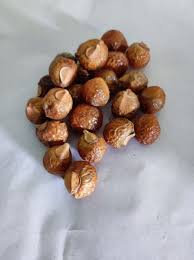
Aritha is the dried fruit of the Sapindus mukorossi tree. Rich in natural saponins, Aritha lathers gently when mixed with water, making it nature’s own cleansing agent.
Benefits of Aritha in Soap:
🌿 Naturally antibacterial
🌼 Gently cleanses without stripping moisture
💧 Removes oil, dirt, and impurities
✨ Helps in managing acne, eczema, and pigmentation
Combined with essential oils, Aritha becomes a multi-functional herbal soap perfect for all skin types.
🧪 DIY Aritha Soap Recipe With Essential Oils
🧴 Ingredients You’ll Need:
✅ Aritha powder – ½ cup (acts as the base cleanser)
✅ Melt-and-pour glycerin soap base – 500g (acts as soap structure)
✅ Coconut oil – 2 tbsp (adds moisture and hardness)
✅ Castor oil – 1 tbsp (helps create rich lather)
✅ Essential oils – 10–15 drops (choose based on skin need)
✅ Distilled water – ¼ cup (to mix Aritha if needed)
✅ Soap mold (any silicone or steel mold)
💡 Choosing the Right Essential Oils
Each essential oil offers specific skin benefits. Here are some combinations:
Essential Oil Skin Benefit
Lavender Calms skin, reduces irritation
Tea Tree Fights acne and bacteria
Rose Hydrates and improves glow
Lemongrass Controls oil, refreshes skin
Eucalyptus Soothes inflammation
Sandalwood Reduces pigmentation
🛠️ Method: How to Make Aritha Soap at Home
🔹 Step 1: Prepare the Aritha Paste
In a bowl, mix Aritha powder with warm distilled water to form a paste.
Let it sit for 10–15 minutes so the saponins activate.
🔹 Step 2: Melt the Soap Base
Cut the glycerin base into cubes and melt it using the double boiler method.
Stir slowly until fully liquified.
🔹 Step 3: Mix in Aritha and Oils
Add the Aritha paste to the melted soap base.
Mix well, then add:
Coconut oil
Castor oil
Essential oils of your choice
🔹 Step 4: Pour and Set
Pour the mixture into soap molds.
Let it cool at room temperature for 6–8 hours or refrigerate for 2–3 hours.
🔹 Step 5: Demold and Store
Remove the soap bars and store in a dry, cool place in airtight containers.
🧼 Your handmade Aritha and essential oil soap is now ready to use!
🌸 Benefits of Aritha Soap With Essential Oils
🌱 1. Natural Cleanser Without Harsh Chemicals
The saponins in Aritha cleanse the skin gently, making this soap ideal for:
Sensitive skin
Children
Dry or mature skin types
💧 2. Hydrating and Moisturizing
Coconut oil and glycerin base lock in moisture, preventing dryness and flakiness.
🌿 3. Antibacterial & Anti-Acne Properties
Tea tree and Aritha form a powerful combo against:
Acne
Fungal infections
Body odor
💆♀️ 4. Improves Skin Texture
Aritha’s exfoliating action clears dead cells, while essential oils like rose and sandalwood improve:
Smoothness
Skin elasticity
Natural glow
🧘 5. Reduces Skin Inflammation
Essential oils like eucalyptus and lavender help relieve:
Redness
Sunburn
Inflammation from skin disorders
🧴 6. Chemical-Free and Eco-Friendly
Your DIY Aritha soap contains:
No parabens
No sulfates
No synthetic fragrance
✅ Safe for you and the environment.
🔄 How to Use Aritha Soap for Best Results
Lather soap directly on wet skin or with a loofah.
Use morning and evening for face and body cleansing.
Follow up with natural moisturizer like aloe vera gel.
🧴 Pro tip: Use with Aritha-infused shampoo or DIY face masks for a full herbal routine.
📢 Common FAQs About Aritha Soap with Essential Oils
❓ Is this soap suitable for sensitive skin?
✅ Yes! Especially if you use gentle essential oils like lavender or chamomile.
❓ Can I use this soap on my face?
Yes. This soap is gentle enough for daily facial cleansing, especially for:
Acne-prone skin
Oily skin
Sensitive skin
❓ How long does the soap last?
Each soap bar lasts around 3–4 weeks with daily use, depending on size and storage.
❓ Can I use other herbs in the soap?
Absolutely. Add neem powder, turmeric, or aloevera gel for more skin benefits.
❓ How should I store the soap?
Store in a cool, dry place, ideally in a wooden or metal soap dish with drainage to avoid moisture buildup.
🧘♀️ Dirghaanshi’s Herbal Tip: Ayurvedic Dosha Guide to Soap
Dosha Common Skin Type Ideal Essential Oils
Vata Dry, flaky Sandalwood, rose
Pitta Sensitive, red Lavender, aloe vera
Kapha Oily, acne-prone Tea tree, lemon, neem
🌼 Final Thoughts: Go Natural, Go Nourishing with Aritha Soap
Handmade soaps not only protect your skin but also bring you closer to ancient, Ayurvedic wisdom. Aritha, a humble herb with foaming power, when blended with skin-healing essential oils, offers a luxurious and chemical-free cleansing experience.
By making your own Aritha soap, you’re:
Supporting natural wellness
Avoiding toxic skincare
Saving money on store-bought, chemical-rich products
🌿 Whether you’re a DIY enthusiast or someone looking to revamp your skincare routine, Aritha soap with essential oils is a natural choice that works from the inside out.